
UPC Barcode Files for Packaging Designers: Formats, Size, Color and Quiet Zones
You've bought your UPC codes, and now the barcode has to go on the box, bag, or label your designer is building. This is where a surprising number of launches go wrong: a barcode stretched to fit a gap, shrunk too far, printed in the brand's accent color, or placed across a fold. The packaging looks great — and the code won't scan. So what does a designer need to put a UPC barcode on packaging correctly?
The direct answer: use the PDF barcode file, place it at 80–200% of its standard size without stretching it, keep the white margins on both sides, and print it as dark bars on a light background on a flat part of the pack. Below are the specs to hand your designer and printer, plus a checklist to run before you approve the print run.
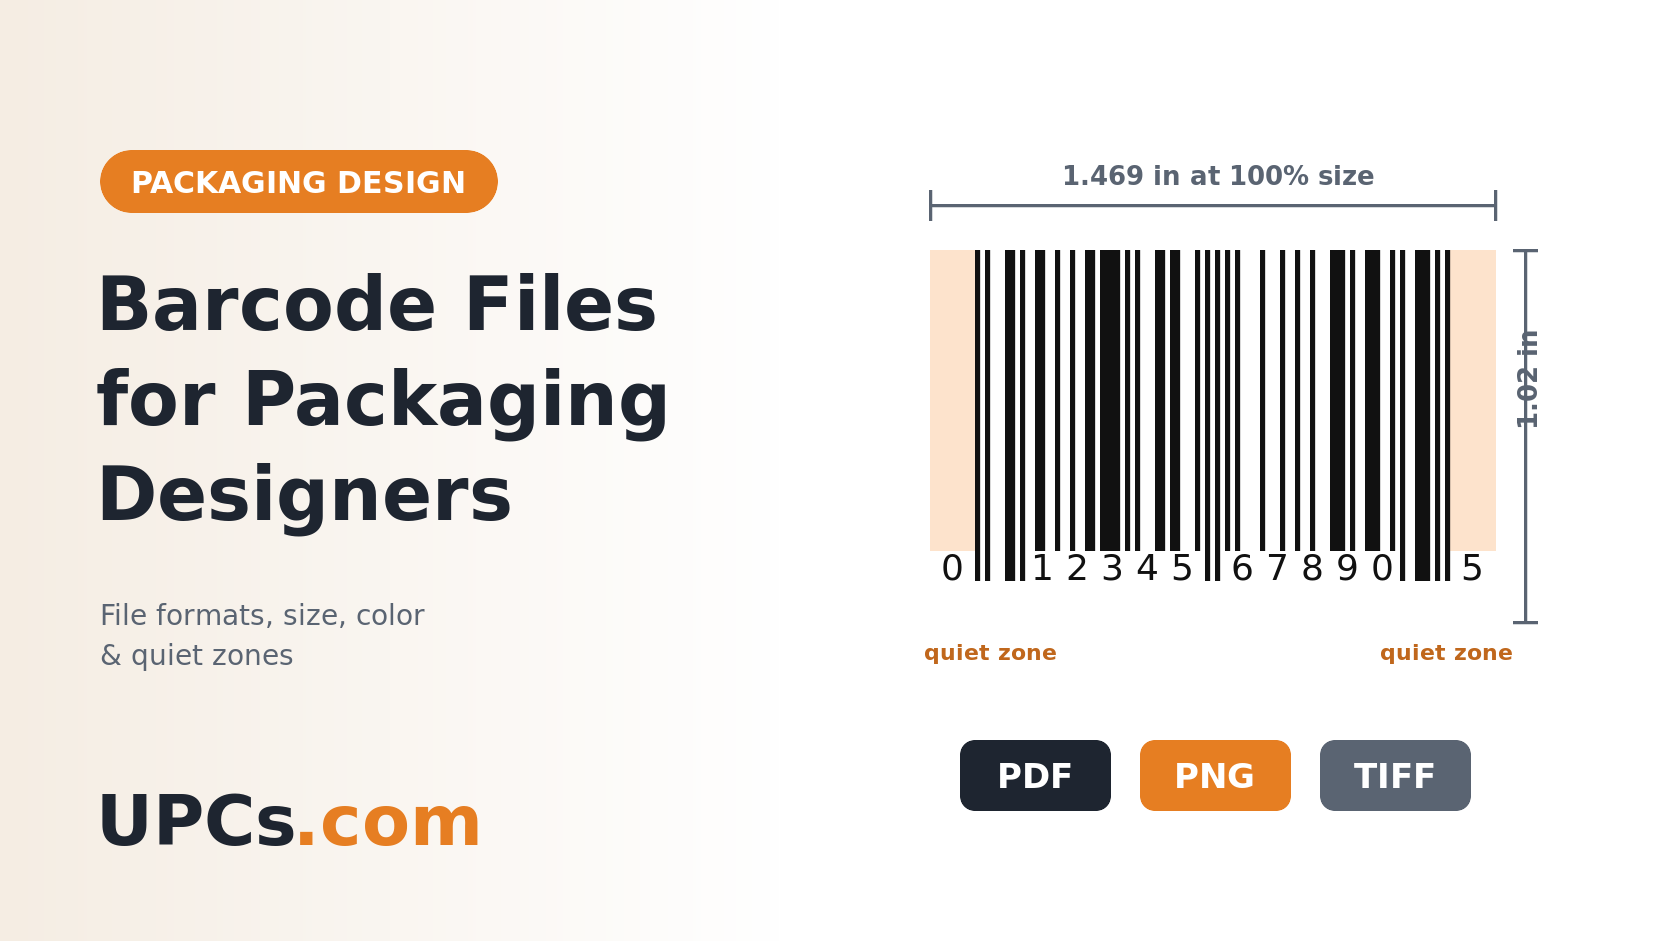 Standard UPC size, the quiet zones on either side, and the file formats included with every UPCs.com order.
Which Barcode File Should Your Designer Use?
Every UPCs.com order includes a spreadsheet (CSV) of your codes and a ZIP file with a barcode image for each code in four formats. Here's when to use each:
| Format | Best For | Notes |
|---|---|---|
| Packaging artwork and commercial printers | Opens in Illustrator, InDesign, and Affinity; hand this one to your designer | |
| TIFF | Label printing and print-ready files | High resolution; use at its supplied size or smaller |
| PNG | Label software and home or office printing | Crisp edges; don't enlarge it beyond its supplied size |
| JPG | Quick previews and mockups | Compression can soften the bar edges, so avoid it for final print |
Does your printer insist on EPS or another format? Just ask — we're glad to provide other formats. And never retype the digits or redraw the bars: use the file exactly as supplied so the bars and numbers always match your code.
Size: Stay Between 80% and 200%
A UPC-A barcode has a standard ("100%") size of about 1.469" wide × 1.02" tall (37.3 × 25.9 mm), including the numbers underneath. You can scale it, as long as you:
- Stay between 80% and 200%. At 80%, the barcode is about 1.175" × 0.816". Smaller than that, and many scanners struggle.
- Scale proportionally. Lock the aspect ratio; never stretch only the width or only the height.
- Don't cut the bars shorter. Trimming the height to squeeze a barcode into a tight space makes it hard to scan at checkout. If the space is too small, move the barcode rather than crop it.
(More sizing and placement examples: how to size and place barcodes.)
Keep the Quiet Zones Clear
The quiet zones are the white margins to the left and right of the bars — at least about 0.12" (3 mm) each side at standard size. They tell the scanner where the code starts and ends. Our barcode files include them, so the rule is simple: don't crop the file, and don't let text, borders, or artwork creep into the margins.
Color: Dark Bars, Light Background
Scanners read the contrast between bars and spaces using red light. That makes some brand colors unreadable:
| Scans Well | Risky | Won't Scan |
|---|---|---|
| Black bars on white | Dark bars on kraft paper or light gray | Red, orange, or pink bars |
| Dark blue, green, or brown bars on white or pale yellow | Bars printed on glossy film or metallic foil | Light bars on a dark background |
Printing on kraft, clear film, or foil? Put a solid white box behind the barcode. It's the easiest fix, and it looks deliberate.
Placement on the Pack
- Choose a flat area on the back or bottom of the pack, away from folds, seams, edges, and flaps.
- On narrow bottles and tubes, turn the barcode 90° so the bars run horizontally around the curve rather than wrapping across it. (Example: barcodes on supplement bottles.)
- Keep one barcode per pack face, and make sure an old or supplier barcode isn't visible nearby.
Step-by-Step: The Pre-Print Checklist
-
1
Match Each Barcode to the Right Product
With several sizes or flavors, it's easy to swap two files. Check the digits in the artwork against your code list for every version of the pack. (How to count and assign codes: how many UPC codes do I need?)
-
2
Confirm Size, Margins, and Color
80–200% of standard size, proportional scaling, full bar height, clear quiet zones, dark bars on a light background.
-
3
Send the PDF to Your Printer
Commercial printers sometimes make small adjustments for ink spread on their presses. A vector PDF gives them clean artwork to work from.
-
4
Print a Proof at Actual Size
Print the artwork at 100% on your office printer, or ask your printer for a physical proof on the real material.
-
5
Scan It Before You Approve
Scan the proof with a phone app and confirm the number matches the product. A 30-second scan is far cheaper than reprinting a pallet of boxes. (Also: common printing mistakes and why a barcode won't scan.)
Frequently Asked Questions
What file format is best for a UPC barcode on packaging?
A vector PDF. It scales cleanly and is what commercial printers prefer. TIFF and PNG are fine for labels printed at their supplied size.
Can I change the barcode color to match my brand?
Only to other dark colors like navy, dark green, or dark brown, on a light background. Red, orange, and pink bars won't scan.
Can I make the barcode smaller to fit my design?
Down to 80% of standard size, scaled proportionally. Don't cut the height. If it still doesn't fit, find a different spot or use a barcode label on a small product.
What do the numbers under the bars mean?
They're your UPC in human-readable form. (Decoded: how to read a UPC barcode.)
Print-Ready Barcodes in Minutes
Every order includes your codes plus barcode files in PDF, TIFF, PNG, and JPG — ready to drop into your packaging artwork. Buy once, own them forever.
Buy UPC Barcodes Now